
Freeze Frame
Until now converting video into still photographs required a piece of third party software. Since the release of Agisoft Photoscan 1.4 the ability to import video directly has been added. It was time to investigate and see what this function offered us.
With enough light to warm the ocean and a housed digital SLR camera at hand we have traditionally shot stills for photogrammetry. Shooting still images can have several benefits: Still images carry a lot of information in the RAW files and any derived image can have camera meta data embedded and ready to go. Shooting video requires a little more post-shoot work to help things along.
Meta Data
Why is embedded meta data important?
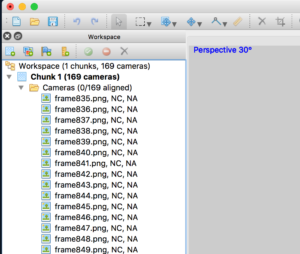
Images marked with NA are ‘Not Aligned’ and NC means ‘Not Calibrated’ – Camera and lens data is missing.
After importing the images for processing you will see a ‘NC’ (Not calibrated) appear alongside any image that lacks camera & lens data. Understanding the physical characteristics of the camera and lens used is important; Photoscan uses this information to estimate where the camera was when the image was shot. Without any idea what kit was used Photoscan has to assume (guess) something and applies a 50mm lens to the calculations. A 50mm lens is very typical focal length for topside photography, but no one – and I mean no one – uses such a lens underwater. Anyone shooting evenly lit scenes underwater will be using a wide-angle lens, something that would be considered extreme and specialist for topside photography. Clearly applying a topside ‘standard’ value to underwater images is going to give unusual results.
UB116 Again
We wanted to take a look at the new feature in Photoscan. Bob Anderson uses video to scan wrecks and very kindly shared a 9 minute clip of a clip shot specifically for use in photogrammetry. The subject was the conning tower of the UB116, a wreck surveyed and geo referenced last year.
With video we need to extract individual frames to create a model. With a typical video there are anywhere between 24 and 60 frames per second to choose from. Photoscan allows you to specify a frame rate you wish to apply, with a lower number generating more files. Its bearing in mind just how many still images are available and how many you actually need. At this point in the process do bear in mind the more images you have to process the better the detail, but the processing time increases too. Its quite easy to generate a mass of data that will take an age to process and create a model no one can view.

Importing video files into Photoscan. Not so much importing, as converting to still images.
Using a frame rate of 30 extracted just over 1000 images from the 9 minute video.
PNG not JPEG
The individual frames pulled from the video are saved in PNG format. While many photographers will be familiar and use JPEG format for images its worth remembering that JPEG files have built-in compression that can lose data. The human eye cannot see what is missing but Photoscan examines the image in greater detail, looking for common points. If one point has been discarded during compression then thats one point not available for alignment. PNG format does not compress, loses nothing and makes all possible points available. Using this file format increases the chances of image alignment so makes perfect sense.
Calibration
With the individual frames extracted and loaded into Photoscan we can see the NC flag alongside every image, nagging us to calibrate. Knowing what camera and lens was used to shoot the video now becomes important. Photoscan needs to be told lens focal length and the pitch of each pixel on the sensor.

Applying calibration values to the images.
Bob shoots with a D500 and a Toking 10-17mm fisheye lens. As an aside, zoom lenses are fine as long as you keep the focal length the same throughout the shoot. With the details of camera and lens entered into the Calibrate dialog it was time to run alignment.
Success and One Failure
1003 of 1004 images aligned first time. Normally I would not bother investigating a single image failing to align, but Bob was curious so I took a look. Here’s what I found:

Nothing to see here…move along. The first frame from the video was lacking detail you could say. Alignment was never going to achieve much with this.
The very first frame extracted from the video was completely black – no surprise that this one failed to align, but the rest sorted themselves into a tidy sparse cloud.

Sparse Cloud of the UB116 Conning Tower
Conclusion
We won’t be swapping the stills for video anytime soon. Cost of kit is prohibitive but its good to know the how and why things work the way they do. There may be times when video is the only kit/media available and having the confidence to know it works before you start processing is very helpful.
The final model has been uploaded to Sketchfab:
iBooks!
If you have found this page useful please consider buying one of my iBooks. Both contain 3D models and one has an entire section devoted to photogrammetry:

.

2 thoughts on “Photoscan 1.4 – Importing Video”
Comments are closed.